Holiday Notice: Our office will be closed from 24th December, and we’ll be back on 2nd January.
All orders will be processed as a priority upon our return. Happy Holidays!"
Voyager Ultra 2 Tent Pitching Instructions
From the classic, tried and tested Voyager, comes the lighter version. The Voyager Ultra 2 tent pitching instructions are as follows:
- Lay out the inner tent.
- Carefully assemble each of the 3 poles. Ensure all the joints are fully inserted.
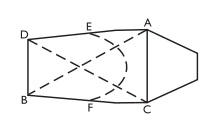
- Using the diagram linked below, lay the poles over the inner tent as follows.
– Pole 1 (blue) diagonally between A and B, making sure the pre-curved section is at the back of the tent.
– Pole 2 (blue) diagonally between C and D, making sure the pre-curved section is at the back of the tent.
– Pole 3 (red) between E and F. - Insert a pole-end into the outer most eyelet of each inner tent eyelet tape. The tapes are colour-coded to match the relevant pole.
- Clip the inner tent to the poles.
- Throw the flysheet over the inner tent.
- Hook flysheet eyelet tabs to pole end-tips.
- Insert each pole-end into the corresponding eyelet tape on the hem of the flysheet. Note: The eyelet tapes are colour-coded to match the relevant pole.
- Peg out the tent.
- Adjust the flysheet tension if required.
The Voyager Ultra 2 is supplied with the following:
- 3 x alloy poles (1 x red, 2 x blue)
- 12 x 1g pegs