- Unpack the tent and lay out the flysheet and inner. (Note: The inner tent is already attached to the inside of the flysheet)
- Carefully assemble the alloy poles. Ensure all the joints are fully connected.
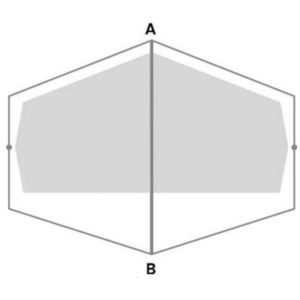
- Slide the main pole through flysheet pole sleeve, shown as the line on the diagram above.
- Insert each pole-end into the corresponding eyelet tab on the hem of the flysheet, tabs are located at points A and B on diagram above.
- Insert the short end poles in the red pockets, at each end under the flysheet vent covers.
- Peg out the end guylines first and adjust tension, then peg out the rest of the flysheet.
- Use 1 or 2 walking poles to support the awning feature
Halny Elite 1 is supplied with:
- x1 main alloy pole
- x2 endalloypoles
- x11 ‘V’ alloy pegs.
Halny Elite 2 is supplied with:
- x1 main alloy pole
- x2 end alloy poles
- x11 ‘V’ alloy pegs.