Zonda 6EP Family Tent Pitching Instructions
Thank you for buying a Wild Country Zonda 6EP tent and we hope you have fun using it. Please read these instructions carefully before you pitch your tent for the first time and keep them in a safe place for future reference. If used correctly and with care your tent should give you years of trouble free use. Top Tip – We would recommend that you take out insurance against storm and accidental damage as these are not covered by the guarantee.
The first time you use the tent
If possible we would recommend that you do a practice pitch before heading off on your camping holiday for the first time. This will give you the opportunity to learn the best way to pitch and then pack away your tent and also check that all the component parts are there. Top Tip – don’t forget to take the pegs and pump with you!
Please also consider the weather conditions before using the tent. This tent is designed to be used in moderate wind and weather conditions so either do not pitch the tent or take it down in strong winds or adverse weather such as hail or snowfall. Please note this tent is not designed for or guaranteed for long term, static or commercial use.
Condensation and ventilation – what you need to know before you go
Your tent is constructed using an impermeable waterproof PU coated outer fabric that has factory taped waterproof seams. It also has various vents and mesh panels that aid air circulation and these should be kept clear and left open for maximum effect. However in many conditions and especially if there is little wind then condensation will be noticeable inside the tent. This can actually run or drip down onto the groundsheet and can create pools of water. This is not due to leakage through the fabric or seams but simply from the warm moist air inside the tent (caused by the occupants) condensing against the cooler impermeable waterproof coating of the outer tent fabric. Top Tip– The condensation can be quite extreme at times so we would recommend taking a quick drying absorbent cloth to mop up any excess water.
Where to pitch
If possible find a level area and ideally one that is protected from the wind. Keep in mind that it is best to face the main door away from the prevailing wind direction so pitch the back of the tent into the wind if you can. Avoid pitching under trees because tree sap is extremely sticky and difficult to clean off and even a small falling branch can damage your tent. Clear the chosen area of any lose objects and pay particular attention to remove anything sharp to prevent damage to the built in groundsheet
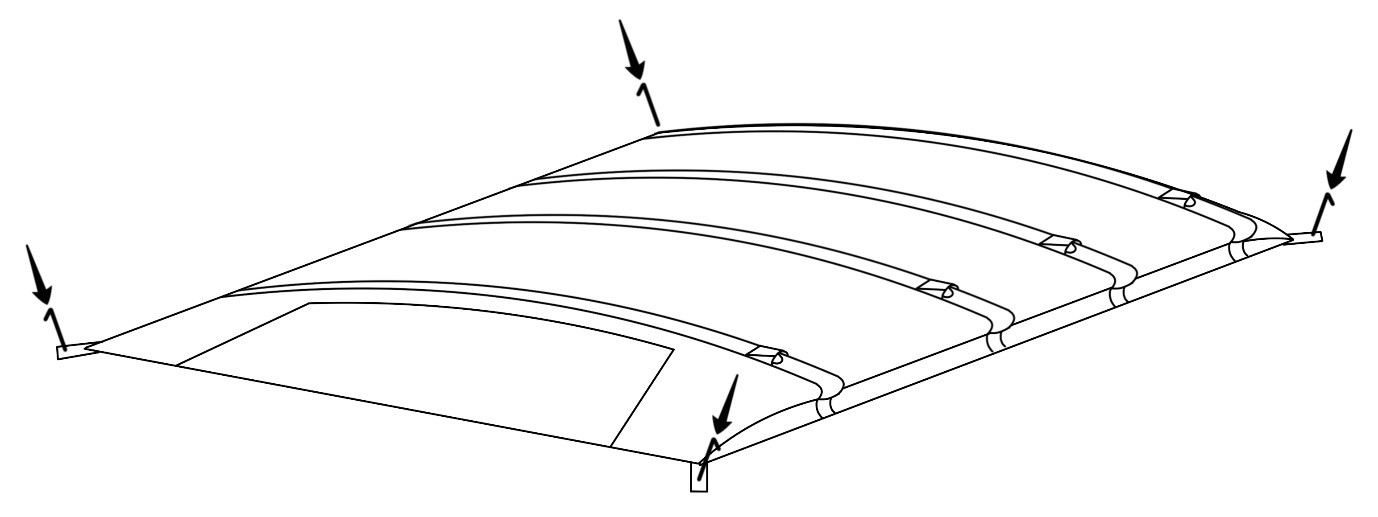
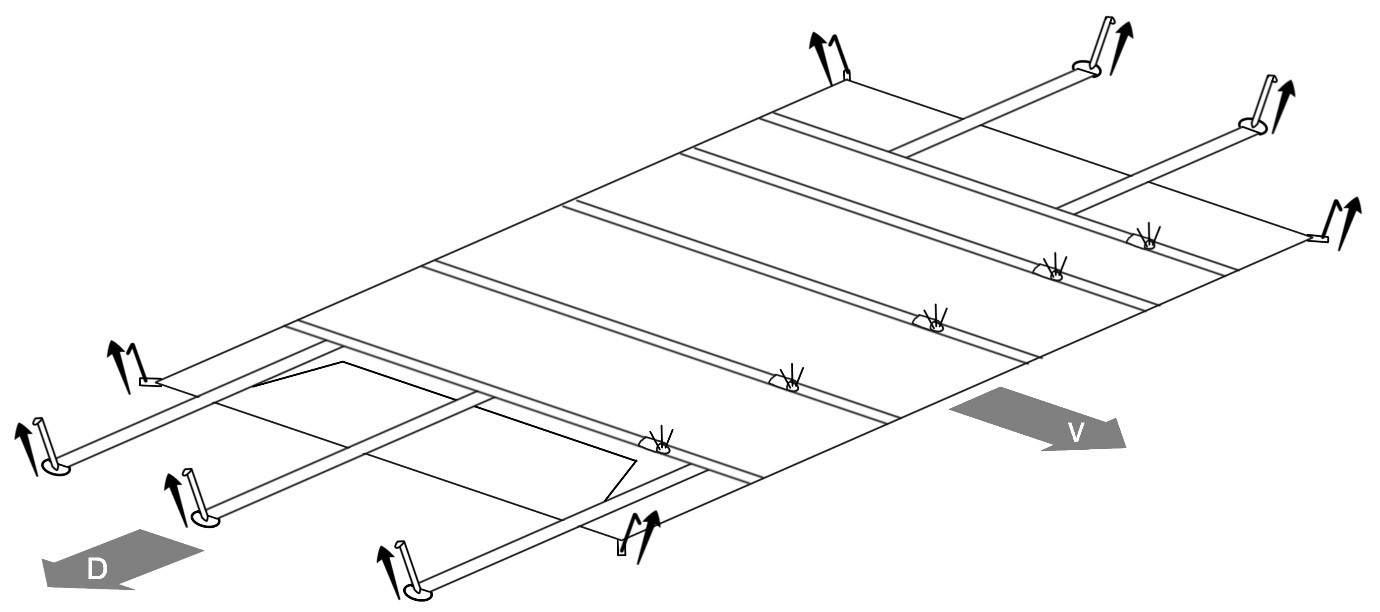
How to pitch
We would recommend using a footprint groundsheet (available separately) as extra protection from dirt and damage for the built in groundsheet. If you have one of these first lay it down on your prepared area and peg out each corner to hold it in place (keep in mind the advice on wind direction). Then un-roll the tent on top (if not simply un-roll the tent over the prepared area) ensuring the groundsheet is on the bottom and peg out each corner using the wire pegs supplied. You should ensure that the groundsheet is a rectangular shape and is taut between the pegs. You may need to reposition these pegs later.
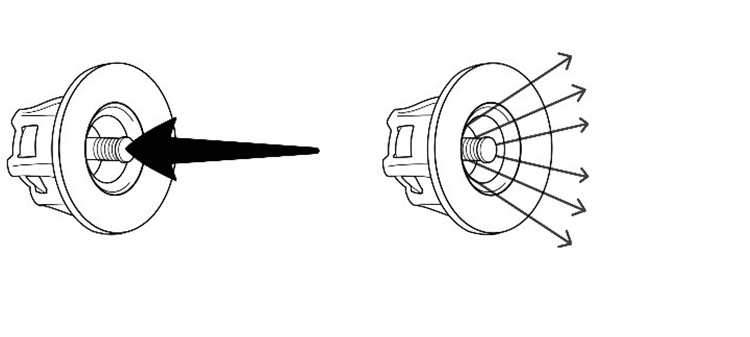
Top Tip – Before inflating the Airflex poles ensure that the outer and inner doors are unzipped to allow air to enter the tent and that all of the valves are in the non-air return state (centre sprung button in fully out position).
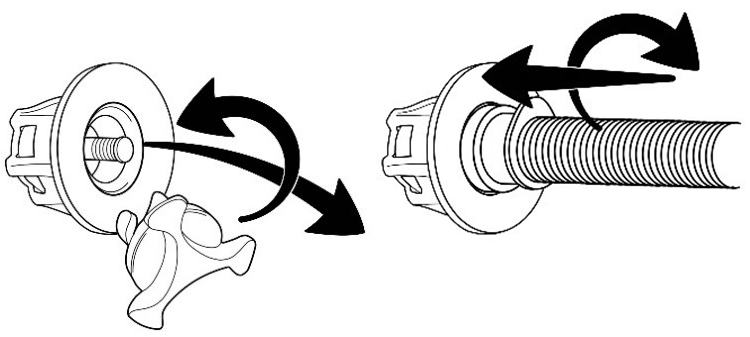
Starting from the air poles each side of the side door connect the hose from the pump to the inflation valve by twisting the hose nozzle clockwise and inflate the pole to about 5 psi (maximum of 7 psi shown on the pump gauge). Top Tip – When detaching the hose from the valve use a rapid anticlockwise twist to prevent the valve connector from detaching from the hose. If the pole deflates when you disconnect the hose you will need to press the centre sprung button into the fully out position and then re-inflate the pole.
Continue inflating the remaining poles until all are inflated. You may well need to go inside the tent to push the poles upward for the tent to take shape but once you have done this make sure you close all of the outer valve caps to prevent accidental deflation and also air leakage. Top Tip – You may need to pull gently on and then peg out the main end guy tapes temporarily to keep the tent upright during the pitching process.
Very important point – Never open the inner zip of the Airflex pole tube once it is inflated. Opening the zip will cause the inner tube to burst. The inner zip has a cable tie to keep it closed that should only be removed for repairing or replacing the inner tube.
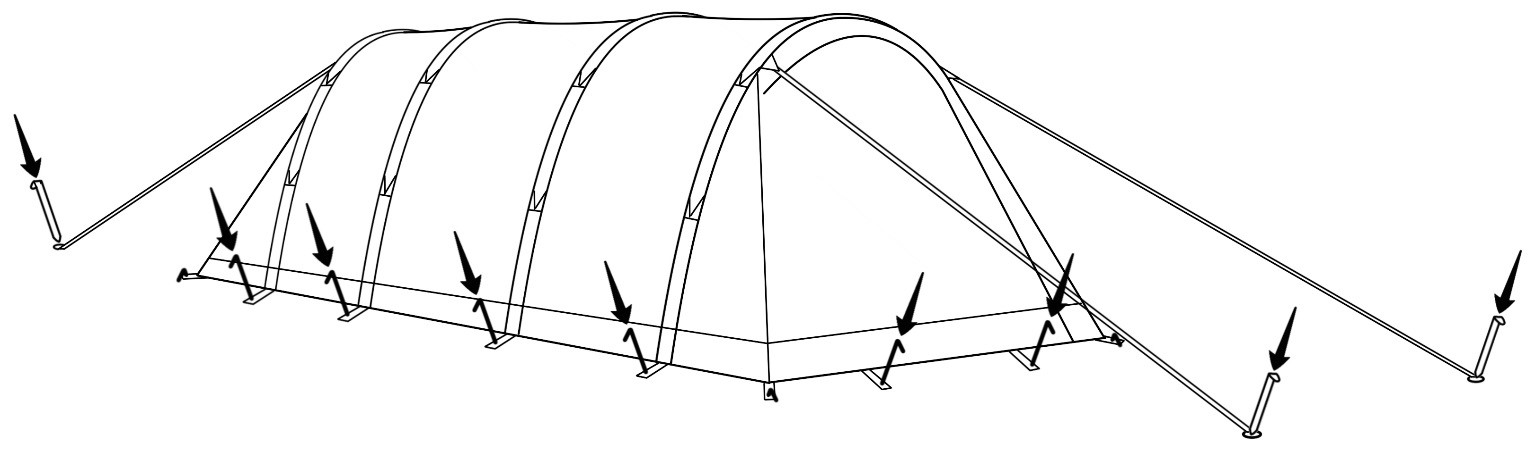
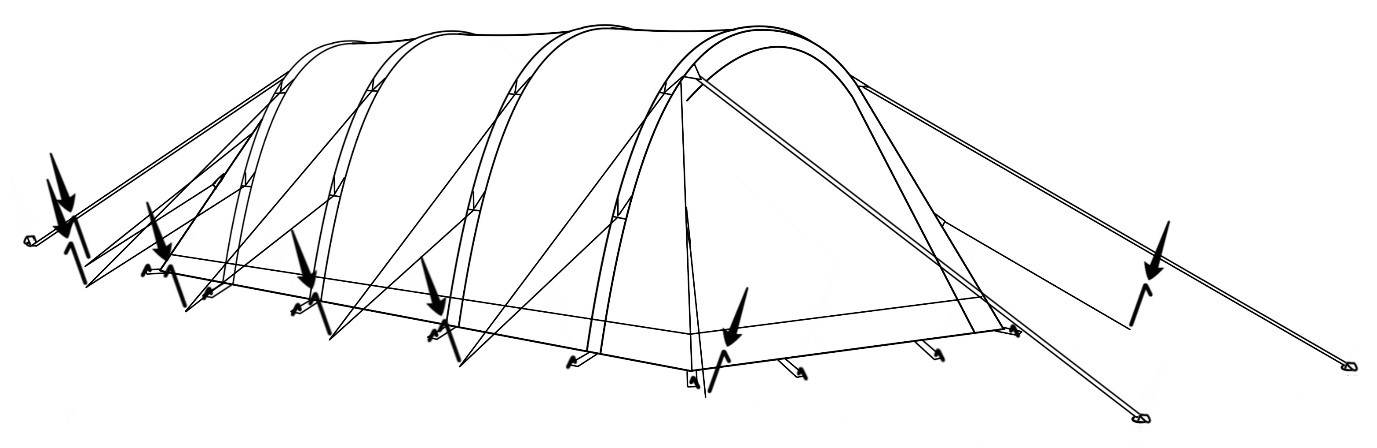
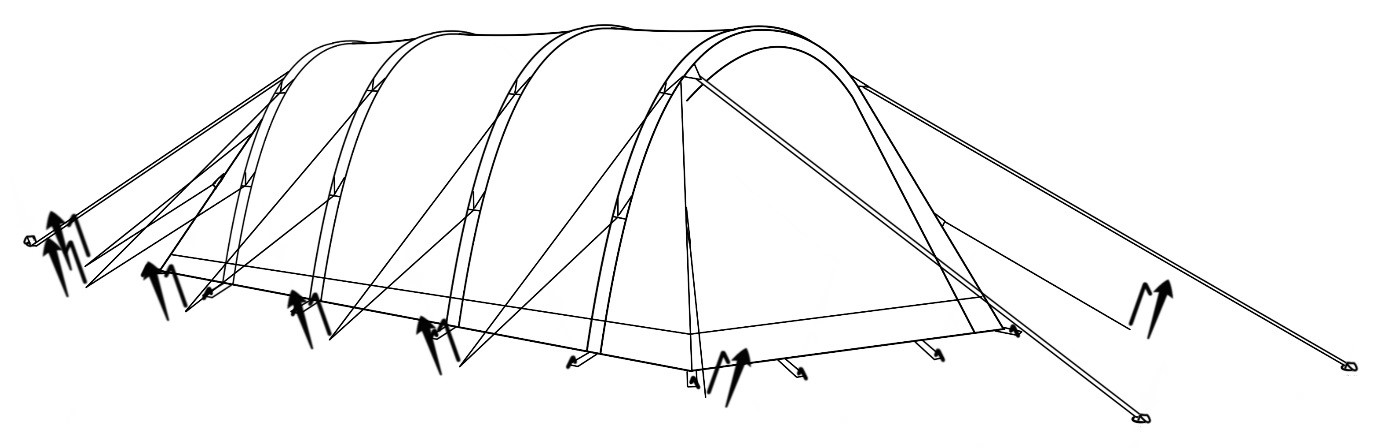
Once the tent has taken shape close all of the entrances so that the tent can be tensioned correctly. At this stage you may need to reposition the corner pegs to ensure that the groundsheet is taut and that the sides are all in line. Now fully extend out the main end webbing guy tapes and add 5 to 6 twists to each (this helps reduce wind noise) before pegging them out properly using the larger V pegs supplied. Now add some tension to the tapes to pull the outer tent fabric taut. Top Tip – Don’t over tension the tapes as this will pull the roof height down.
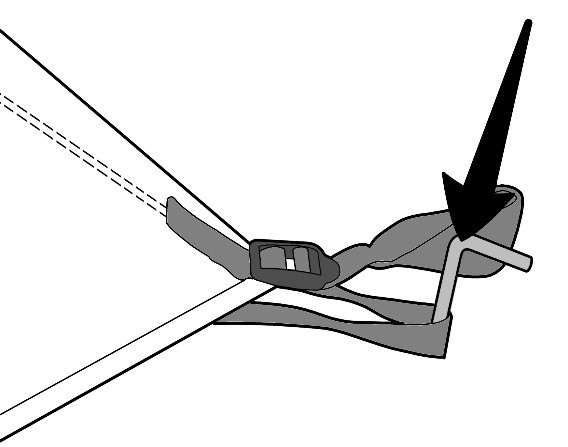
Using the wire pegs, peg around the sides and ends of the outer tent using the webbing pegging points provided. Most have a buckle for adjustment and these should be slackened off before pegging. Top Tip – Do not peg through the stitched webbing loop. Slacken the webbing behind the buckle and peg through the resulting loop.
Guy Lines – why these are important
Regardless of the weather conditions we would always recommend that you peg out all the guy-lines. Whilst there may be little wind when you pitch your tent, this situation can change extremely quickly so it’s best not to get caught out – especially at 2 o’clock in the morning!
Start by pulling the guy lines out in-line with the poles and seam lines and peg out using the wire pegs. Pegs should be angled into the ground at 45 degrees away from the pegging point and it is best to use a rubber or plastic headed mallet to do this. Top Tip– short guy lines with steep angles are less effective than longer guy lines with shallower angles so if space allows ensure that the guy lines are adjusted to as long a length as possible.
The guy lines are adjusted using the tensioning runners and the tension should be checked and adjusted regularly. Top Tip – Do not over tension the guy lines as this will pull the tent out of shape. There should be just enough tension to retain the tent shape.
The inner tent bedroom
This is normally pre-attached but can be removed for cleaning or storage. The inner is suspended from the outer tent using a ring and toggle system and to aid installation several of these are colour coded. There are also buckles at floor level to align and retain the base of the inner tent. Top Tip – toattach the inner start from the bottom at the back and work your way to the top at the front. Reverse the process to take the inner tent out.
Top Tip – The inner tent can be left attached when inflating or deflating the tent but remember to leave the inner tent doors open to ease the process.
Front porch groundsheet
The front porch groundsheet can now be installed if required. Simply use the hooks and toggles to attach to the main tent. You will need to partially deflate the pole in order to install the groundsheet so you can position the end of the pole on the attachment patch. Alternatively, you can leave the groundsheet out so you can use the porch as a wet area.
How to pack away
- Remove all furniture, toys, pets, small children etc. from inside the awning.
- Leave outer doors partially open but close mesh vents and panels.
- Close all window curtains.
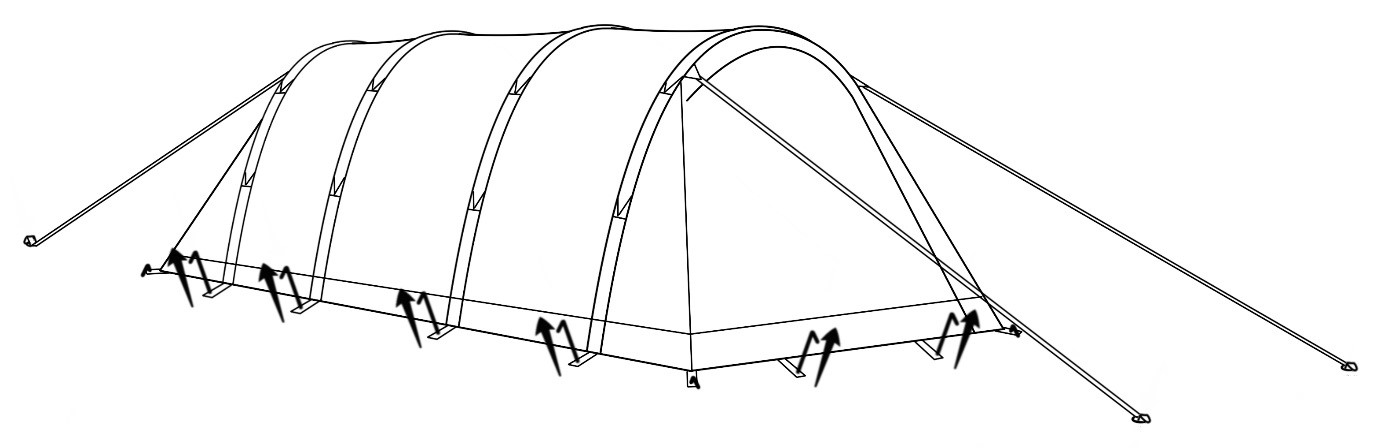
- Un-peg the side and end guy lines and tie up to prevent tangles then slacken off the end guy tapes but don’t un-peg them yet.
- Un-peg all of the pegging points around the outer of the tent but leave the corner pegs in place for the time being.
- Starting at each end open the outer valve cap on each Airflex pole and press the centre sprung button on each to deflate all the poles. Wait for most of the air to escape and leave them open whilst you pack the tent away.
- Now remove the pegs at the corner of the groundsheet and also from the end guy tapes. The guy tapes can now be folded back on top of the outer tent.
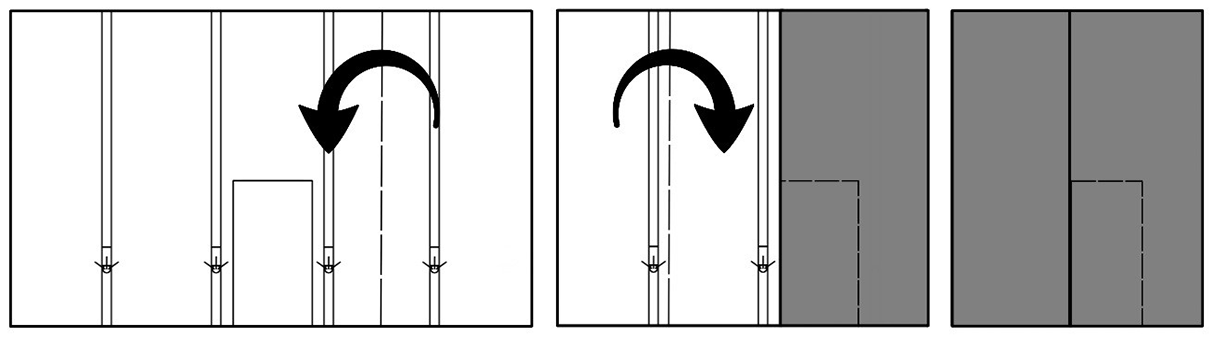
- Fold the tent so the folded seams are in line with the Airflex pole direction and so the groundsheet does not come in contact with the outer fabric of the flysheet to help keep the flysheet clean. Top tip – fold from the back of the tent first to expel the air from the bedroom compartments.
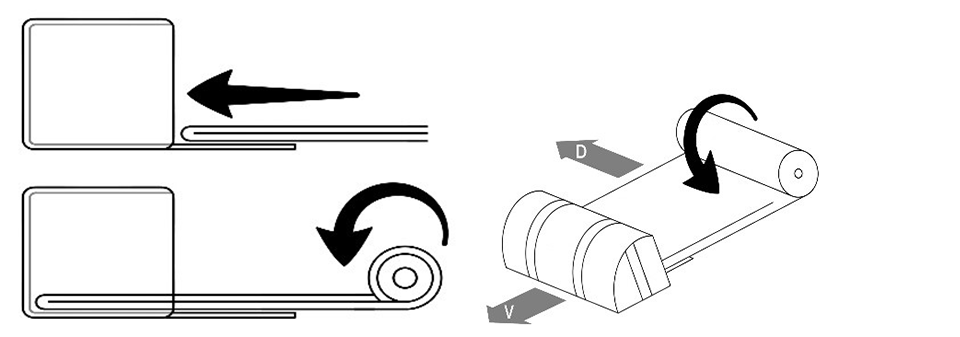
- Fold until the tent is the width of the tent bag and then roll it up towards the valve side of the tent to expel all of the air. Place the valve end of the tent on the small attached tarp and then tuck that end into the bag. Simply roll the tent into the bag and then put the peg bag inside. Top tip – it is preferable to leave the pump out of the bag to prevent damage. Close the bag by folding the small tarp inside and clip the buckled webbing straps across the top. Please use the buckled webbing straps to help squeeze the remaining air out of the tent and then gently pull on the toggled draw string to complete the process.
- Always ensure that your tent is completely dry and well aired before you store it. If possible store the tent opened out but if this is not possible at least make sure it is kept in a cool, dry, dark and well ventilated place. If the tent is not completely dry and well aired it can develop mildew which is extremely difficult to eradicate.
- To clean your tent we would recommend using cold (never hot!) water with either a sponge and/or a soft brush. Be gentle. Never scrub the fabric and never use detergent as this will damage the waterproof coating. Leave to air dry naturally and ensure it is completely dry before storage.
- Keep sharp objects away from the Airflex poles. They require no specific maintenance but should be treated with care to avoid damage. Please see below for details should an Airflex pole deflate unexpectedly.
- Zips are a critical part of the tent so treat them with care. Never force or stand on a zip as this can damage the teeth or puller and clean off any dirt immediately to prevent excessive where.
- Don’t panic – they are normally quite easy to sort out. Simply follow the steps below.
- In the first instance use the supplied valve tool to check that the valve is tight and tighten if necessary.
- Once you have done this re-inflate the pole and if you are still experiencing air loss then follow the steps below.
- Press the centre sprung button on the valve of the leaking pole to release any remaining air pressure.
- Unzip the outer sleeve on the inside of the tent that contains the leaking air pole.
- Carefully remove the entire Airflex pole from the tent. Note that there is hook and loop material at both ends of the pole and around the valve that keep the pole in the correct position so detach carefully.
- With the pole fully deflated gently cut the cable tie so you can unzip the outer case of the Airflex pole to reveal the inner tube.
- To locate the puncture add a small amount of air to the inner tube. If the puncture is not obvious you may need to submerge the inner tube in water to locate the leak.
- Once you have located the leak, fully dry the inner tube (if you used water to find it) and then repair using a patch that is available from your retailer.
Storage and care
Some general points
UV Degradation – Your tent is designed for touring/occasional use. It is made from synthetic fabric that over time will deteriorate due to the effects of Ultra Violet light that comes from exposure to Sunlight. With this in mind, if you plan to leave your tent pitched for an extended period then we would recommend choosing a shaded location. The UV degradation can include a change of or a fading of the colour, a reduction in the strength of the fabric and a breakdown of the waterproof coating. Please note that Ultra Violet degradation is not covered under the guarantee.
Seams and waterproofing – All of the main seams on your tent have been tape sealed at the factory to prevent leakage. Any water found inside the tent is more often than not the result of condensation. However, should the seam tape become damaged or if you notice a small leak at a seam then this can be remedied using a tent seam sealant available from your retailer.
Cooking – NEVER COOK OR USE NAKED FLAMES INSIDE YOUR TENT!
Whilst your tent complies with the ISO5912 fire retardant standard you should NEVER cook or use naked flames inside the tent. Not only could this cause your tent to catch fire but there would be a potential risk from carbon monoxide poisoning. Please ensure all users of the tent fully understand the fire precautions that are shown on the label sewn into the inside of the tent.
If an Airflex pole deflates unexpectedly.
Once repaired gently push the inner tube back into the outer case ensuring that it is not twisted. Close the zip on the outer case ensuring the zip is fully closed and use a cable tie to secure the zip – trim off any excess from the cable tie. At this point you can add a small amount of air to check if the leak is repaired before re-installing in the tent. If all is well reverse the steps in point 4 and 5 if not then repeat steps 6 to 8.
Should you need to replace an Airflex pole at any point then they can be bought from your retailer. Simply follow the instructions supplied with the replacement air pole for installation.